====================================================
(接上文《》)4-2-3、业务层与Class文件管理
zookeeper控制模块的业务相关层(封装层),负责根据Apache Curator层分析好的事件类型、Path Node名称信息、Path Node内容信息,进行Class文件的生成。这里的关键点是,Apache Camel有一个动态加载的限制:它只能在被创建的线程中完成Service(例如Route路由定义)的动态加载过程。Apache Curator事件监听规则基于zookeeper原生客户端,当发生ZK事件时Apache Curator会使用一个独立线程处理这个事件而不是在启动Apache Curator组件的线程。所以Apache Camel的Context上下文对象的动态加载操作不能在事件线程中进行,我们需要一个同步队列将Class File文件生成之后的,对Apache Camel相关的操作过程通知到其他线程去继续执行。请看以下业务相关层的实现类的代码片段(对ESBCamelServiceListener接口的实现):
public class ESBCamelServiceListenerImpl implements ESBCamelServiceListener { ...... public void onProcessorAdded(String systemId, String packageName, String className, byte[] contents) { /* * 当一个处理器进行添加时,要做以下处理 * 1、首先根据systemId的信息,在ESB-Broker Server的映射容器中寻 * 找个业务系统定义的各种Server Class 文件在ESB-Broker Server节点本地存储的根路径 * 2、然后按照packageName、className、contents的信息将这个class文件写入到正确的位置 * * 注意:由于此时只是完成了class了文件的写入,所以这个class文件还没有被classloader进行初始化。 * 另外由于,CamelContext并没有提供单独进行processor处理器加载的功能,而是随着routes实例的加载而加载 * 而这个工作将在onRouteDefineChanged事件中完成,所以在完成processor-class文件的写入后,就不需要再做其它事情了。 * */ if(StringUtils.isEmpty(systemId) || StringUtils.isEmpty(packageName) || StringUtils.isEmpty(className) || contents == null) { ESBCamelServiceListenerImpl.LOGGER.error("必要的入参数据不正确,请检查!"); return; } this.createClassfile(systemId, packageName, className, contents); } ...... public void onRouteDefineAdded(String systemId, String packageName, String className, byte[] contents) { /* * 当一个新的路由定义事件发生时,要做以下几件事情: * * 1、根据systemId的信息,在ESB-Broker Server的映射容器中寻 * 找个业务系统定义的各种Server Class 文件在ESB-Broker Server节点本地存储的根路径 * 2、然后按照packageName、className、contents的信息将这个class文件写入到正确的位置 * 3、不能在本线程操作Apache Camel,只能通过一个同步队列通知Apache Camel主线程 * */ if(StringUtils.isEmpty(systemId) || StringUtils.isEmpty(packageName) || StringUtils.isEmpty(className) || contents == null) { ESBCamelServiceListenerImpl.LOGGER.error("必要的入参数据不正确,请检查!"); return; } // 第1、2两步处理过程,都是在这里完成 this.createClassfile(systemId, packageName, className, contents); // 3、===============加载到CamelContext中 SynchronousQueue camelContextOperateQueue = CamelContextOperateQueueUtils.getCamelContextOperateQueue(); try { camelContextOperateQueue.put(packageName + "." + className); } catch (InterruptedException e) { ESBCamelServiceListenerImpl.LOGGER.error(e.getMessage() , e); } } ...... /** * 这个私有方法用于生成class文件 * @param systemId * @param packageName * @param className * @param contents */ private void createClassfile(String systemId, String packageName, String className, byte[] contents) { // 1、============ Map systemPathMapping = SystemRootPathUtils.getSystemPathMapping(); URL systemRootURL = systemPathMapping.get(systemId); if(systemRootURL == null) { return; } // 2、============开始写入class文件 ClassFileUtils.createClassfile(systemRootURL, packageName, className, contents); // 完成 ESBCamelServiceListenerImpl.LOGGER.info("===================" + packageName + "." + className + ".class 生成过程结束"); }} 以上代码片段只列举对ESBCamelServiceListener接口的两个实现方法:onProcessorAdded(String, String, String, byte[])和onRouteDefineAdded(String, String, String, byte[]),其他的实现方法处理过程都是相似的,为了节约篇幅就不再赘述了。请注意createClassfile(String, String, String, byte[])这个私有方法,这个私有方法是进行文件写入的操作,它将在指定的业务系统存储Class File的目录下,写入最新的Class文件。
而具体的文件处理过程放在“ClassFileUtils”这个工具类中,这个工具类是笔者自定义的工具类,主要是保证文件处理过程能够在各处进行代码重用。其中无非就是File Stream的写入过程,因为过于简单就不再占用文章篇幅了。这里截取一些“ClassFileUtils”工具类的代码片段:
/** * class文件的处理工具。工具类不允许继承 * @author yinwenjie */public final class ClassFileUtils { ...... /** * 工具类不允许进行实例化 */ private ClassFileUtils() { } ...... /** * 通过这个工具方法,可以进行class文件的创建 * @param systemRootURL 本次进行系统创建的system业务系统存储class文件的根目录 * @param packageName class文件的包信息 * @param className class文件的类名信息 * @param contents class文件的内容信息 */ public static void createClassfile(URL systemRootURL , String packageName, String className, byte[] contents) { ...... // 开始输出文件内容 try { ByteArrayInputStream byteInputStream = new ByteArrayInputStream(contents); FileOutputStream fileOut = new FileOutputStream(classFile); int realLen; byte[] fileContexts = new byte[4096]; while((realLen = byteInputStream.read(fileContexts, 0, 4096)) != -1) { fileOut.write(fileContexts, 0, realLen); } fileOut.close(); byteInputStream.close(); } catch (Exception e) { ClassFileUtils.LOGGER.error(e.getMessage() , e); return; } ...... } ......} 在ESBCamelServiceListenerImpl类的代码片段中,需要注意的另一个细节是:onRouteDefineAdded方法中使用的“SynchronousQueue”同步队列。官方对于“SynchronousQueue”同步队列的特性解释是:“是这样 一种阻塞队列,其中每个 put 必须等待一个 take,反之亦然。同步队列没有任何内部容量,甚至连一个队列的容量都没有。”这个队列也在笔者以前的文中介绍过,它是一个没有任何存储空间的队列,当某一个线程使用“SynchronousQueue”同步队列的put()方法进行推入操作时,会一直进行等待。一直等待到另一线程使用“SynchronousQueue”同步队列的take()方法,试图取得一个值为止。这样保证了对Apache Camel进行操作的主线程能够依次处理其它线程传来的对Apache Camel进行动态Routes加载的请求。
4-3、ESB-Broker Server启动过程
通过本文第4-2小节的介绍,读者实际上应该可以理解到一些涉及ESB-Broker Server节点启动过程的关键信息点。由于Apache Camel服务模块对Service的加载依赖于Apache Curator组件对zookeeper的操作,因为主程序需要从后者中读取有哪些处理器、哪些路由定义需要加载到Camel Context上下文中;另一方面各种Service加载组件又必须等待Camel Context上下文加载组件启动成功后才能进行进行,否则就没有加载的目的地。
所以整个ESB-Broker Server节点的启动过程就需要倒着进行:首先通过Curator连接到zookeeper服务器,并完成事件监听的注册。待前面所有准备工作完成,就需要从zookeeper服务端读取需要加载的处理器、原子服务和编排好的路由配置的数据信息(每种业务系统都需要分别进行读取和处理)。最后启动Camel Context上下文,并一直试图从“SynchronousQueue”同步队列中取出其它线程传来的对Camel Context上下文进行动态加载的请求。以上文字描述的启动顺序可以抽象为以下示意图:
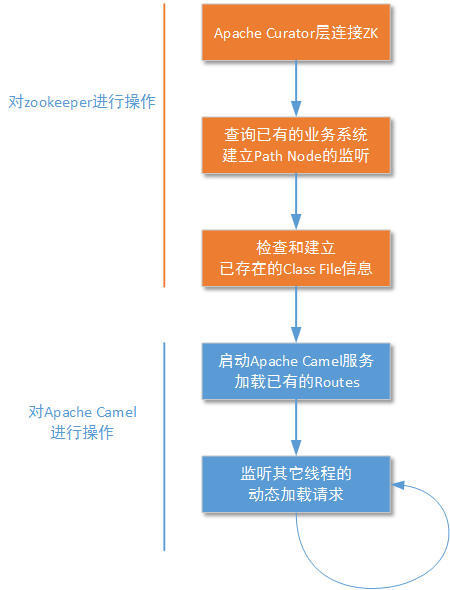
注意,当新启动的ESB-Broker Server节点从zookeeper服务端查询需要加载的各种Service时,并不代表这些Service的class信息都需要从zookeeper上读取Path中的data内容进行加载。主程序会检查这些Service所对应的class是否已经存在于本地的某个路径上,如果已经存在,则直接使用classloader进行加载。以下的代码片段大致说明了ESB-Broker Server的启动过程:
public class BootStartup { ...... /** * 这是一个固定的存储class文件的根路径 * 正式系统中,这个值可来自于系统的配置文件 */ private static final String CLASSROOTPATH = "/testCamelRoot"; /** * 主执行函数 * @param args * @throws Exception */ public static void main(String[] args) throws Exception { new BootStartup().start(); } ...... /** * 主要的启动过程在这里 */ protected void start() throws Exception { /* * 启动顺序为: * * 1、首先使用Apache Curator组件进行zookeeper服务端连接, * * 2、通过Apache Curator组件查询目前已有的业务系统ID信息, * 以便依据这些业务系统ID,建立本地ClassLoader的根路径(当然,由就不需要创建了) * 并且注册Apache Curator封装层的监听。 * * 3、检查第2步得到的业务系统下,已经存在的processor处理器定义和已有的route定义 * 以便生成class信息。 * * 4、启动Apache Camel服务,将第三步那些route定义进行动态加载 * * 5、经过以上步骤,整个启动过程完成了。现在主线程需要一直等待从SynchronousQueue队列发来的动态加载请求了。 * */ // 1、=============== // 连接到zookeeper CuratorFramework zkClient = CuratorFrameworkFactory.newClient("192.168.61.140:2181", 30000, 30000, new RetryNTimes(50, 3000)); zkClient.start(); BootStartup.LOGGER.info("完成zookeeper服务端的连接工作!"); // 2、=============== // 取得已存在的系统 List systemNames = zkClient.getChildren().forPath("/"); // 开始构造classLoader路径、建立针对zookeeper路径下的监听、 List systemClassRootPaths = new ArrayList (); List alreadyRouteBuilders = new ArrayList (); for (String systemName : systemNames) { // 这是system业务系统在本地存储class的根目录 File systemClassRootPath = new File(CLASSROOTPATH + "/" + systemName); if(!systemClassRootPath.exists()) { systemClassRootPath.mkdirs(); } Map systemRootPathMapping = SystemRootPathUtils.getSystemPathMapping(); // 记录到工具类中,以便其它线程需要时进行取用 systemRootPathMapping.put(systemName, systemClassRootPath.toURI().toURL()); systemClassRootPaths.add(systemClassRootPath); // 建立ZK目录监听 PathChildrenCache watcherProcesses = null; PathChildrenCache watcherRoutes = null; try { // 建立System业务系统下的processes目录和监听 if(zkClient.checkExists().forPath("/" + systemName + "/processes") == null) { zkClient.create().creatingParentsIfNeeded().forPath("/" + systemName + "/processes"); } watcherProcesses = new PathChildrenCache(zkClient, "/" + systemName + "/processes", true); watcherProcesses.getListenable().addListener(new ProcessesPathChildrenCacheListener()); watcherProcesses.start(); // 建立System业务系统下的routes目录和监听 if(zkClient.checkExists().forPath("/" + systemName + "/routes") == null) { zkClient.create().creatingParentsIfNeeded().forPath("/" + systemName + "/routes"); } watcherRoutes = new PathChildrenCache(zkClient, "/" + systemName + "/routes", true); watcherRoutes.getListenable().addListener(new RoutesPathChildrenCacheListener()); watcherRoutes.start(); } catch(Exception e) { if(watcherProcesses != null) { watcherProcesses.close(); } if(watcherRoutes != null) { watcherRoutes.close(); } } // 3、=============== // 建立已经存在的class文件 List processesPaths = zkClient.getChildren().forPath("/" + systemName + "/processes"); List routesPaths = zkClient.getChildren().forPath("/" + systemName + "/routes"); // 创建processor文件 for (String processesPath : processesPaths) { String fullClassName = processesPath; // 获得class的包名和类名 int lastIndex = fullClassName.lastIndexOf("."); String className = fullClassName.substring(lastIndex + 1); String packageName = fullClassName.substring(0 , lastIndex); byte[] fileContexts = zkClient.getData().forPath("/" + systemName + "/processes" + "/" + processesPath); // 创建文件 ClassFileUtils.createClassfile(systemClassRootPath.toURI().toURL(), packageName, className, fileContexts); } // 创建route文件 for (String routesPath : routesPaths) { String fullClassName = routesPath; // 获得class的包名和类名 int lastIndex = fullClassName.lastIndexOf("."); String className = fullClassName.substring(lastIndex + 1); String packageName = fullClassName.substring(0 , lastIndex); byte[] fileContexts = zkClient.getData().forPath("/" + systemName + "/routes" + "/" + routesPath); // 创建文件 ClassFileUtils.createClassfile(systemClassRootPath.toURI().toURL(), packageName, className, fileContexts); RouteBuilder routeBuilder = (RouteBuilder)Class.forName(packageName + "." + className).newInstance(); alreadyRouteBuilders.add(routeBuilder); } } // 4、============= // 首先启动Apache Camel服务 CamelContext camelContext = new DefaultCamelContext(); camelContext.start(); BootStartup.LOGGER.info("Apache Camel Context 启动完成......"); // 加载和设置ClassLoader List URLs = new ArrayList (); for (File systemClassRootPath : systemClassRootPaths) { URLs.add(systemClassRootPath.toURI().toURL()); } ClassLoader currentClassLoader = Thread.currentThread().getContextClassLoader(); ClassLoader camelESBClassLoader = new URLClassLoader(URLs.toArray(new URL[]{}) , currentClassLoader); Thread.currentThread().setContextClassLoader(camelESBClassLoader); camelContext.setApplicationContextClassLoader(camelESBClassLoader); // 然后就可以进行RouteBuilder的加载 for (RouteBuilder routeBuilder : alreadyRouteBuilders) { try { camelContext.addRoutes(routeBuilder); } catch(Exception e) { BootStartup.LOGGER.warn(e.getMessage() , e); } } // 5、============= // 开始监控CamelContext动态操作队列 SynchronousQueue camelContextOperateQueue = CamelContextOperateQueueUtils.getCamelContextOperateQueue(); String mustLoadedClassName = null; // 如果没有收到其它线程的加载请求,主线程将停止在这里 while((mustLoadedClassName = camelContextOperateQueue.take()) != null) { Class routeBuilderClass = (Class )camelESBClassLoader.loadClass(mustLoadedClassName); if(routeBuilderClass != null) { RouteBuilder routeBuilder = routeBuilderClass.newInstance(); camelContext.addRoutes(routeBuilder); } } } ......} 以上代码关于“SynchronousQueue”同步队列的使用中,主线程将一直试图使用同步队列的take()方法取得数据,如果没有数据主线程就将会等待在这里。这里主要进行Route路由定义的动态加载,但是在实际应用中,还应该根据“SynchronousQueue”同步队列中数据的状态判断是进行Route路由定义的加载还是卸载。
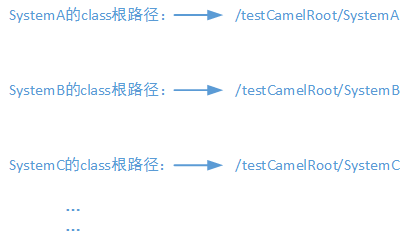
我们还需要对运行BootStartup实例的主线程进行ClassLoader的重设置。这是因为每一个业务系统在本地都有一个独立的class文件的存储位置,但是这个位置并不在JVM默认的加载路径中。JVM的ClassLoader组织层次最顶层的Bootstrap Loader位置和各上层的Extension Loader都不会加载以上代码中的“/testCamelRoot/XXXXX”这个位置。所以我们需要编写代码进行干预,如下图所示:
====================================================
(接下文)